Friday, July 29, 2011
Resetter Epson Stylus T13
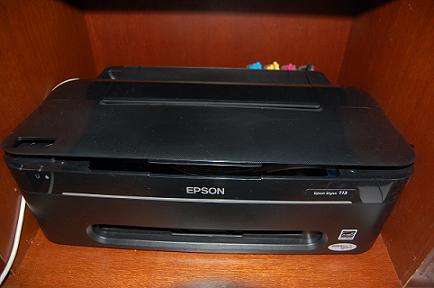 Epson Stylus T13 and ME32 Adjustment Program
Please follow the steps below to reset the protection counter
Double click Adjprog.exe.
Click “Accept” button.
Click "Select" button. and choose your printer model then click "OK"
Click “Particular adjustment mode” button.
Select on “Waste ink pad counter” and click “OK” button.
Check on Main pad counter and click on “Initialization” button and the program will reset the protection counter.
Turn off the printer as a program instructed then turn on again.
Click “Finish” button. and its done!
download the software here

Thursday, July 28, 2011
Cleanning Scanner Mirrors on HP3330
This is not an Hewlett Packard document, the author does not work for Hewlett Packard and is not responsible for any damage you do to your printer. This procedure is for skilled repair technicians and is not recommended without some knowledge of equipment repair. Proceed at your own risk.
1. Open the document feeder and pull up on the two black tabs on the left and right.
2. Pull up on the right part of the doc feeder then the left, remove doc feeder, set aside.
3. Open front door and rear fuser door.
4. Remove screws closest to teal colored fuser release levers. (side cover screws)
5. Pull right cover out from back while releasing clip on bottom of cover, pull cover towards the back and remove.
6. Push on indentation at back of left cover and pull out at back, this cover is hinged.
7. Remove four screws now visible at base of scanner assy., two on left two on right.
8. Slide covers towards back and remove.
9. Remove two screws in the back just above the fuser and just below the scanner assy. base. Remove two screws in the front, visible now after removing the scanner assy. base covers on the right and left (the left one is just behind the hinged cover near the top hinge.)
10. Remove flat ribbon cable (on left side) at either connection point to disconnect scanner assy. from print engine.
11. Entire scanner assembly can now be slid forward and removed.
12. Close the front, rear and left side doors on the print engine portion and set it aside.
13. Grab front panel face plate at top and pull forward and remove. (or pry gently at top of face plate).
14. At top of exposed front panel you will see four slots in the scanner assy. At the third one from the left there is a latch (dark grey plastic). Push down on the latch with a screwdriver and slide the whole panel assy. to the right. Lift up and out making sure to disconnect the cable.
15. Remove the three screws in the now exposed dark grey front panel cradle and cover, remove the two cables connecting the cover to the main board, pry gently at the top outer corners of the cover and pull it forward and down, remove the cover.
16. Now remove the four scanner assy. screws (one and the center front, center back, center right, center left) all are facing down under the assy. (Or just flip it upside down and remove the four visible screws.
17. Turn the unit back upright and remove the four screws at the back/top (two of them are down inside where the doc feeder normally goes.) Remove the top scanner cover.
18. DANGER your about to work on the scanner carriage itself there is a really good chance that you could break it or the mirrors or bulb so proceed at your own risk.
19. At the top and bottom left side of the black cover enclosing the mirrors are two slots, if you put a small screwdriver in the slots and push gently to the right and lift that side of the cover it should come loose. Then open it to the right and remove it from the right slots.
20. Remove the black screw at the front of the assy., Disconnect the white wires from the CCD board and out of the harness, lift the clear plastic bulb holder out with the bulb then remove it from the rear. (it’s a tight fit at the front.)
21. The top mirror is held in by some really tight clips they have to be removed from the bottom right (clean the mirrors without this step if possible). NOTE: optical mirrors are not like a bathroom mirror, there is no glass covering the reflective surface. The back side of the mirror has glass covering it so if you get it in backwards it won’t work. (The way to tell which side you have is touch your screwdriver to the mirror and if it’s the right side the screwdriver will appear to touch the reflection of the screwdriver, if it’s the wrong side the screwdriver will not touch the reflection of the screwdriver because of the glass covering the reflective surface.
22. Now clean the remaining mirrors and lens very thoroughly with alcohol. Make sure they are very clean. You can put the top mirror back and clean it in place to make cleaning it easier.
23. When re-assembling the top cover check to make sure the white strip on the right side is clean.
24. Reverse procedure for re-assembly.
Continue Reading..
1. Open the document feeder and pull up on the two black tabs on the left and right.
2. Pull up on the right part of the doc feeder then the left, remove doc feeder, set aside.
3. Open front door and rear fuser door.
4. Remove screws closest to teal colored fuser release levers. (side cover screws)
5. Pull right cover out from back while releasing clip on bottom of cover, pull cover towards the back and remove.
6. Push on indentation at back of left cover and pull out at back, this cover is hinged.
7. Remove four screws now visible at base of scanner assy., two on left two on right.
8. Slide covers towards back and remove.
9. Remove two screws in the back just above the fuser and just below the scanner assy. base. Remove two screws in the front, visible now after removing the scanner assy. base covers on the right and left (the left one is just behind the hinged cover near the top hinge.)
10. Remove flat ribbon cable (on left side) at either connection point to disconnect scanner assy. from print engine.
11. Entire scanner assembly can now be slid forward and removed.
12. Close the front, rear and left side doors on the print engine portion and set it aside.
13. Grab front panel face plate at top and pull forward and remove. (or pry gently at top of face plate).
14. At top of exposed front panel you will see four slots in the scanner assy. At the third one from the left there is a latch (dark grey plastic). Push down on the latch with a screwdriver and slide the whole panel assy. to the right. Lift up and out making sure to disconnect the cable.
15. Remove the three screws in the now exposed dark grey front panel cradle and cover, remove the two cables connecting the cover to the main board, pry gently at the top outer corners of the cover and pull it forward and down, remove the cover.
16. Now remove the four scanner assy. screws (one and the center front, center back, center right, center left) all are facing down under the assy. (Or just flip it upside down and remove the four visible screws.
17. Turn the unit back upright and remove the four screws at the back/top (two of them are down inside where the doc feeder normally goes.) Remove the top scanner cover.
18. DANGER your about to work on the scanner carriage itself there is a really good chance that you could break it or the mirrors or bulb so proceed at your own risk.
19. At the top and bottom left side of the black cover enclosing the mirrors are two slots, if you put a small screwdriver in the slots and push gently to the right and lift that side of the cover it should come loose. Then open it to the right and remove it from the right slots.
20. Remove the black screw at the front of the assy., Disconnect the white wires from the CCD board and out of the harness, lift the clear plastic bulb holder out with the bulb then remove it from the rear. (it’s a tight fit at the front.)
21. The top mirror is held in by some really tight clips they have to be removed from the bottom right (clean the mirrors without this step if possible). NOTE: optical mirrors are not like a bathroom mirror, there is no glass covering the reflective surface. The back side of the mirror has glass covering it so if you get it in backwards it won’t work. (The way to tell which side you have is touch your screwdriver to the mirror and if it’s the right side the screwdriver will appear to touch the reflection of the screwdriver, if it’s the wrong side the screwdriver will not touch the reflection of the screwdriver because of the glass covering the reflective surface.
22. Now clean the remaining mirrors and lens very thoroughly with alcohol. Make sure they are very clean. You can put the top mirror back and clean it in place to make cleaning it easier.
23. When re-assembling the top cover check to make sure the white strip on the right side is clean.
24. Reverse procedure for re-assembly.
Monday, July 25, 2011
Resetter Canon Pixma IP1200 and IP2200
Resetter Canon Pixma IP1200, IP1600,IP2200
Manualy
Discharge of septic tanks overflow error code - "pampersa" It will only software
1. Kachan a service.
DOWNLOAD Service Tool for Canon iP1200, 1600, 2200.
2. Razarhiviruem downloaded archive.
Unzip downloaded file by WinZip.
3. Starting GeneralTool.exe
Run GeneralTool.exe
4. We choose a USB printer port
Select the connected USB port number from USB PORT
5. Select the region - Hit LOCK RELEASE and choose the desired model in SET DESTINATION.
Click LOCK RELEASE, and select the applicable model name in SET DESTINATION
6. In the CLEAR WASTE INK COUNTER choose MAIN or PLATEN counters, which should be reset. If you choose both - both will be dropped.
In CLEAR WASTE INK COUNTER, select MAIN or PLATEN. The selected waste ink counter will be reset. MAIN resets the main waste ink counter, PLATEN resets the platen waste ink counter.
If both the main and platen waste ink absorbers are replaced, reset both the main and platen waste ink counters.
Canon 1600 waste ink counter reset
If you get to use our advice - please share their experience in our Guestbook.
OFFER OBSUDIT RETSEPT DUMPING:
in OUR forum
in the forum site RESETTERS - a site devoted to the continuous filing of ink - SNPCH and everything that relates to a decrease in the cost of printing on inkjet printers Epson, Canon and HP.
Another instruction on clearing:
1. Turn the printer off and disconnect the power cord.
2. Press book. NOT ON and releasing it, connect the power cord.
3. It is still not releasing the book. ON press book. RESUME 2 times.
4. Release the two buttons.
5. Following this indication mistakes must stop.
6. Remove all files with programs attribute Reid Onli (if any)
7. Run this program (file GeneralTool.exe)
8. Choose the printer port in the window USB Port
9. Press book. DEVICE ID, to verify that the program correctly identified the printer model.
10.Nazhat book. EEP-ROM INFORMATION, verify that the meter deep Dx indeed equal to or greater 100.0
11.V window CLEAR WASTE INK COUNTER press the button and MAIN PLATEN. Pressing the button LED printer should mignut.
12.Proverit in the EEP-ROM INFORMATION importance Dx, it must be equal to "0" or more pieces.
Exit from the program. Turn off the printer. Unplug the power cord. Press book. ON and keep it off until the indicator does not (fully defuse the capacitors in BP) Add Printer. Ascertain that there is no indication of errors.
NOTE. Book. LOCK RELEASE unlocks the buttons and functions SET DESTINATION ENDURANCE MODE. If you do not need to change the model to test the printer or the printer in "load", does not have to click.
Continue Reading..
Manualy
Discharge of septic tanks overflow error code - "pampersa" It will only software
1. Kachan a service.
DOWNLOAD Service Tool for Canon iP1200, 1600, 2200.
2. Razarhiviruem downloaded archive.
Unzip downloaded file by WinZip.
3. Starting GeneralTool.exe
Run GeneralTool.exe
4. We choose a USB printer port
Select the connected USB port number from USB PORT
5. Select the region - Hit LOCK RELEASE and choose the desired model in SET DESTINATION.
Click LOCK RELEASE, and select the applicable model name in SET DESTINATION
6. In the CLEAR WASTE INK COUNTER choose MAIN or PLATEN counters, which should be reset. If you choose both - both will be dropped.
In CLEAR WASTE INK COUNTER, select MAIN or PLATEN. The selected waste ink counter will be reset. MAIN resets the main waste ink counter, PLATEN resets the platen waste ink counter.
If both the main and platen waste ink absorbers are replaced, reset both the main and platen waste ink counters.
Canon 1600 waste ink counter reset
If you get to use our advice - please share their experience in our Guestbook.
OFFER OBSUDIT RETSEPT DUMPING:
in OUR forum
in the forum site RESETTERS - a site devoted to the continuous filing of ink - SNPCH and everything that relates to a decrease in the cost of printing on inkjet printers Epson, Canon and HP.
Another instruction on clearing:
1. Turn the printer off and disconnect the power cord.
2. Press book. NOT ON and releasing it, connect the power cord.
3. It is still not releasing the book. ON press book. RESUME 2 times.
4. Release the two buttons.
5. Following this indication mistakes must stop.
6. Remove all files with programs attribute Reid Onli (if any)
7. Run this program (file GeneralTool.exe)
8. Choose the printer port in the window USB Port
9. Press book. DEVICE ID, to verify that the program correctly identified the printer model.
10.Nazhat book. EEP-ROM INFORMATION, verify that the meter deep Dx indeed equal to or greater 100.0
11.V window CLEAR WASTE INK COUNTER press the button and MAIN PLATEN. Pressing the button LED printer should mignut.
12.Proverit in the EEP-ROM INFORMATION importance Dx, it must be equal to "0" or more pieces.
Exit from the program. Turn off the printer. Unplug the power cord. Press book. ON and keep it off until the indicator does not (fully defuse the capacitors in BP) Add Printer. Ascertain that there is no indication of errors.
NOTE. Book. LOCK RELEASE unlocks the buttons and functions SET DESTINATION ENDURANCE MODE. If you do not need to change the model to test the printer or the printer in "load", does not have to click.